How to Take Better Surf Photos: A Complete Guide to Capturing the Perfect Wave
Neptune
March 17, 2026
Why Surf Photography Is Unlike Anything Else
Surf photography sits at the intersection of action sports, landscape, and wildlife photography — and it's arguably harder than all three. You're dealing with constantly moving subjects, unpredictable conditions, saltwater that wants to destroy your gear, and light that changes by the minute. There's no "hold still" in surfing. There's no second take.
But that's exactly what makes a great surf photo so powerful. When you nail it — the spray frozen mid-air, the surfer locked into a critical section, the light pouring through the lip of a wave — you've captured something that will never happen again in exactly that way.
Whether you're a surfer who wants to document your sessions, a photographer looking to break into the surf world, or someone who just wants better shots of friends and family in the water, this guide will walk you through everything you need to know.
Choosing the Right Camera Gear
The Best Camera for Surf Photography Depends on Where You're Shooting
Let's get the gear question out of the way first, because it's what everyone asks about — but it matters less than you think.
From the beach or a pier (telephoto shooting): A DSLR or mirrorless camera with a long telephoto lens is the gold standard. You'll want at least 200mm of reach, and ideally 400–600mm if you're shooting from any real distance. Popular choices include:
- Canon or Sony mirrorless bodies (R7, a6700, or full-frame options like the R5 or a7 IV) paired with a 100-400mm or 150-600mm zoom
- Budget option: A used Canon 7D Mark II or Nikon D500 with a 70-300mm lens will still produce excellent results
- Superzoom bridge cameras like the Nikon P950 offer incredible reach at a fraction of the cost, though image quality drops in low light
From the water: This changes everything. You need a waterproof housing for your camera, or you go the action camera route:
- Water housings from companies like Aquatech, SPL, and Outex let you take your mirrorless or DSLR into the surf with a fisheye or wide-angle lens (typically 15-35mm)
- GoPro or DJI Action cameras are the most accessible option — mount them on your board, hold them while bodysurfing, or attach them to a mouth mount
- Waterproof compacts like the Olympus Tough series work for casual water shots without the bulk
The honest truth: your phone in a waterproof case can produce surprisingly good results in the water if the light is right. Don't let gear anxiety stop you from shooting.
Camera Settings That Actually Matter
If you're shooting in manual or semi-automatic modes (and you should be), here are the settings that will make or break your surf photos.
Shutter Speed: The Non-Negotiable
This is the single most important setting in surf photography. Too slow and your surfer is a blur. Too fast and you might be underexposing unnecessarily.
- 1/1000s or faster for sharp action shots — this freezes spray, captures facial expressions, and stops the surfer mid-maneuver
- 1/2000s or faster for heavy, powerful surf where water is moving fast
- 1/500s can work in smaller, slower waves, but you're gambling
- 1/30s–1/60s only if you're intentionally going for motion blur (a panning shot where the surfer is sharp but the background streaks)
Start at 1/1250s and adjust from there. It's the sweet spot for most conditions.
Aperture: Balancing Sharpness and Background
- f/5.6–f/8 gives you the sharpest results on most lenses and enough depth of field to keep the surfer in focus even if your autofocus isn't pixel-perfect
- f/2.8–f/4 in low light (dawn patrol, overcast days) — you'll sacrifice some depth of field but gain precious stops of light
- f/11+ when you want everything sharp from foreground to background (landscape-style surf shots)
ISO: Keep It as Low as Conditions Allow
Modern cameras handle high ISO remarkably well, so don't be afraid to push it. A sharp, slightly noisy photo at ISO 1600 beats a blurry, clean photo at ISO 100 every time. In bright daylight you'll be at ISO 100-400. Dawn and dusk sessions might push you to ISO 1600-6400.
Autofocus Mode
Set your camera to continuous autofocus (AF-C on Nikon/Sony, AI Servo on Canon). Use a cluster of focus points or zone AF rather than a single point — surfers move erratically, and a single focus point will lose them. If your camera has subject detection or tracking AF, turn it on.
Burst Mode
Shoot in continuous high-speed burst. Surf moments are measured in fractions of a second. The difference between an average shot and a cover shot can be one frame. Shoot at your camera's maximum frame rate and edit ruthlessly later.
Shooting from the Beach: Technique and Positioning
Most surf photographers start from the beach, and there's absolutely nothing wrong with that. Some of the most iconic surf images in history were shot from dry land.
Pick Your Position Carefully
Where you stand matters more than what camera you're holding. Consider these factors:
- Angle to the wave: Shooting straight-on (the surfer coming directly at you) creates dramatic, compressed images. Shooting from an angle shows more of the wave face and the surfer's line. Experiment with both.
- Elevation: Higher vantage points (cliffs, piers, lifeguard towers) let you see down into the wave and reveal the surfer's positioning on the face. Beach-level shooting creates more intimate, eye-level perspectives.
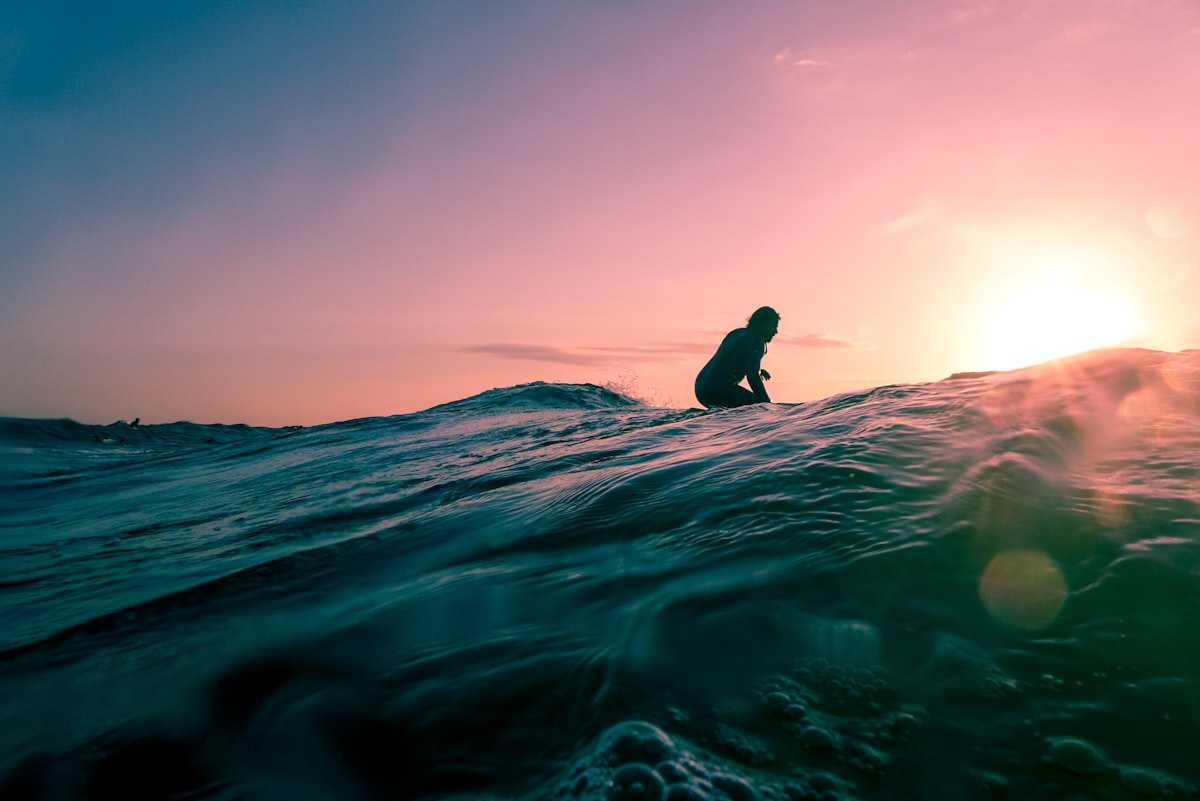
- Sun position: As a general rule, keep the sun behind you or to the side. Shooting into the sun creates silhouettes (which can be stunning — but it's a specific look, not a default). Side-lit waves show incredible texture in the water.
- Background: Watch what's behind your subject. A clean ocean horizon is classic. A cluttered background with boats, swimmers, and buildings can kill an otherwise great shot.
Tracking the Surfer
With a long telephoto, you'll be tracking surfers across the wave. Practice smooth panning — keep the surfer centered in your frame and follow their movement. Start tracking before they pop up so you're already locked on when the action begins.
Pre-focus on the area where waves are breaking. When a surfer starts paddling for a wave, acquire focus early and let your continuous AF do the rest. Learning how to read waves and predict where surfers will go will dramatically improve your ability to anticipate the action.
The Moments That Make Great Photos
Not every frame in a sequence is worth keeping. Learn to recognize and anticipate the decisive moments:
Working on water photography? Get personalized tips from Neptune's AI coach.
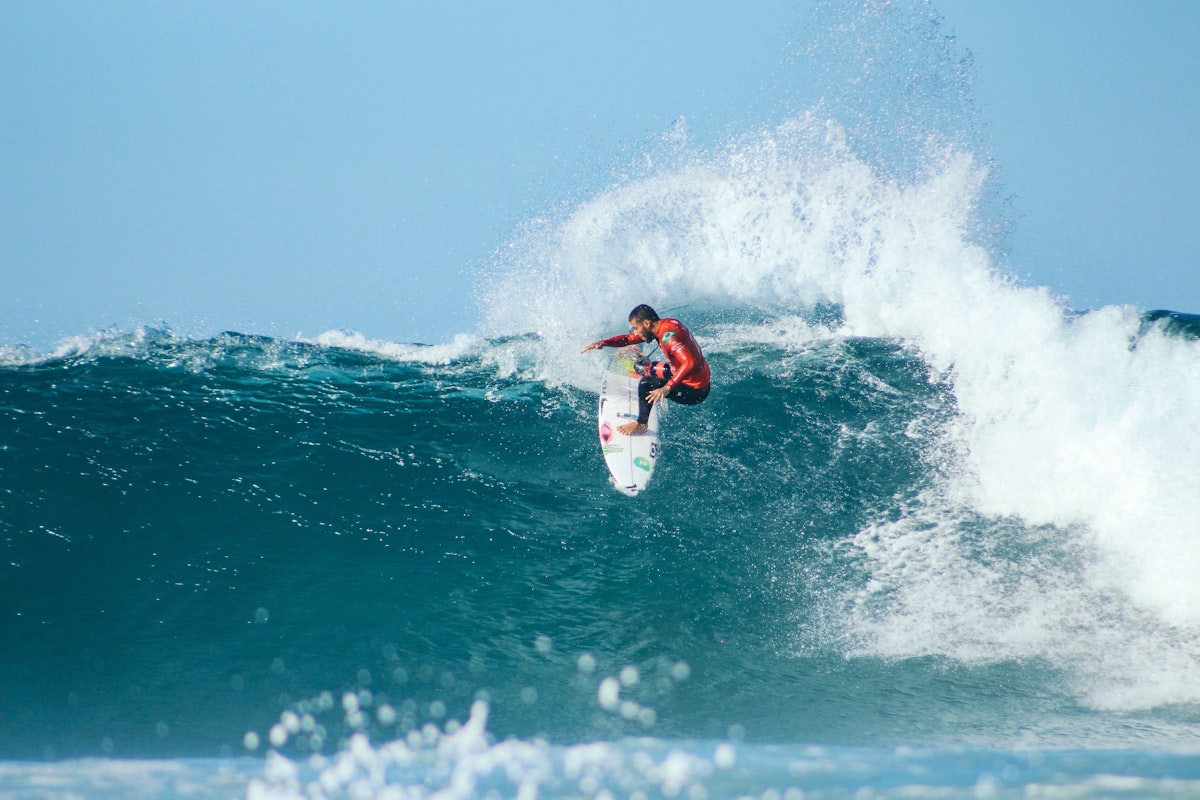
Try Free- The bottom turn: The surfer is compressed, the spray is flying, and the wave is towering behind them
- Top turns and cutbacks: Maximum spray, dynamic body position
- The barrel: If a surfer is getting tubed, that's your shot. Track them into the barrel and keep shooting until they emerge (or don't)
- The paddle out: Don't overlook the quieter moments — a surfer duck-diving through a wave or sitting in the lineup can be just as compelling
- Wipeouts: Honestly, some of the most dramatic and shareable photos are spectacular wipeouts
Shooting from the Water
Getting in the water with your camera takes surf photography to another level. The perspectives you can achieve from water level are impossible to replicate from shore.
Safety First — Always
This cannot be overstated. You need to be a confident swimmer and comfortable in surf before you bring a camera into the water. A water housing rig can weigh several pounds and limits your swimming ability. You need to be able to handle the conditions without the camera before you handle them with one.
Start in small, manageable surf. Waist-high waves at a beach break you know well. Don't chase heavy conditions until you've logged serious hours swimming with your housing.
Water Positioning
In the water, you have two main positions:
Inside the break (between the surfer and the beach): This is where you get those dramatic head-on shots of surfers coming straight at you. It's also where you're most likely to get hit by a surfboard, washed by whitewater, or slammed on the sand. Stay aware, keep your head on a swivel, and always have an escape plan.
On the shoulder (to the side of the breaking wave): Safer and more versatile. From here you can capture the full wave face, barrel shots from the channel, and wide-angle compositions that show the surfer in the context of the whole wave.
Wide-Angle Water Technique
With a fisheye or ultra-wide lens in a water housing, you need to be close to your subject — we're talking 3-10 feet away. This means anticipating where the surfer will be and positioning yourself there before the wave arrives.
The classic water shot workflow:
- Watch the sets and identify the takeoff zone
- Position yourself just inside or on the shoulder of where waves are breaking
- When a surfer paddles for a wave, swim into position
- Start shooting before they're fully up — the pop-up and first turn are prime moments
- Keep shooting as they pass, pivoting your body to track them
Lighting: The Secret Ingredient
You can have perfect technique, the best gear, and ideal waves — but if the light is bad, the photo will be flat. Understanding and chasing good light is what separates good surf photographers from great ones.
Golden Hour Is Everything
The hour after sunrise and the hour before sunset produce warm, directional light that makes everything look incredible. Waves become translucent. Spray glows. Skin tones are warm and flattering. Shadows add depth and drama.
If you're serious about surf photography, set your alarm. Dawn patrol isn't just for surfers — it's for photographers too.
Midday Light Isn't Always Bad
Overhead sun gets a bad reputation, but it has its uses in surf photography:
- Tropical destinations: When the water is clear and turquoise, midday sun illuminates the water from above, creating those electric blue and green tones
- Barrel shots: Direct overhead light can penetrate into the barrel, illuminating the surfer inside
- Aerial perspectives: Drone shots and elevated angles benefit from overhead light that reduces shadows
The worst light is typically the flat, grey overcast that removes all contrast and makes everything look dull. Even then, you can get moody, atmospheric shots — you just need to lean into it rather than fight it.
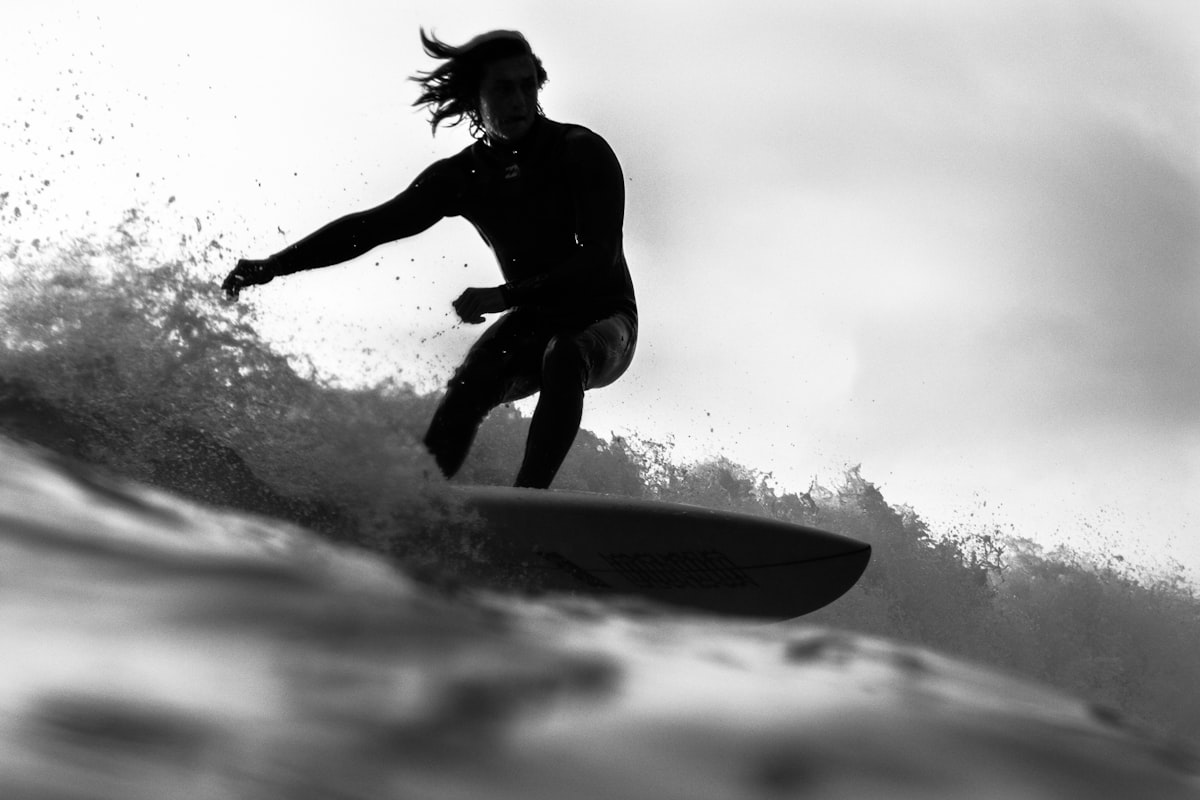
Backlighting for Drama
Shooting into the light is technically challenging but can produce the most stunning results. When a wave is backlit, the lip becomes translucent and glows. Spray turns into diamonds of light. Surfer silhouettes against bright water create powerful, graphic images.
To make backlighting work:
- Expose for the highlights (the bright water and spray) and let the surfer go dark for a silhouette
- Or expose for the surfer and let the background blow out for a dreamy, high-key look
- Use spot metering on the surfer if you want to preserve detail in both
Composition Tips for Stronger Surf Images
Give the Surfer Room to Move
Leave space in the frame in the direction the surfer is traveling. A surfer jammed against the edge of the frame with no room ahead feels cramped and static. Space in front of them creates a sense of motion and anticipation.
Use the Wave as a Frame
The curve of a wave, the barrel opening, the spray off the lip — these natural elements can frame your surfer beautifully. Look for compositions where the wave itself guides the viewer's eye to the subject.
Don't Always Center Your Subject
The rule of thirds applies to surf photography as much as any other genre. Place the surfer at an intersection point. Put the horizon on the upper or lower third line, not dead center. This creates more dynamic, visually interesting compositions.
Include the Environment
Not every surf photo needs to be a tight crop of the surfer. Some of the most evocative images show a tiny surfer against a massive wave, a wide view of a perfect lineup with a lone rider, or a surfer walking down a cliff trail to an empty break. Context and scale tell a story that tight action shots can't.
Post-Processing: Developing Your Surf Photos
Essential Edits
Keep your editing workflow simple and consistent:
- White balance: Correct any color casts. Ocean scenes often skew blue or green — warm them up slightly for a more natural look
- Exposure and contrast: Lift shadows to recover detail in the surfer if they're backlit. Add contrast to make the image pop
- Crop and straighten: Level the horizon (nothing screams amateur like a tilted ocean). Crop to improve composition
- Dehaze: A touch of dehaze cuts through the atmospheric haze and salt spray that often softens long-range telephoto shots
- Sharpening: Apply moderate sharpening, especially for web output. Over-sharpening creates ugly halos
Color Grading for Mood
The surf photography community has moved toward more natural, less heavily filtered looks in recent years. That said, subtle color grading can enhance the mood:
- Warm tones (boosted oranges and yellows in highlights) for golden hour sessions
- Cool, desaturated tones for moody, overcast days and big-wave sessions
- Teal and orange contrast (a classic look where shadows go slightly teal and highlights go warm) works well for tropical water
Culling Ruthlessly
A single session might produce 500-2000 frames. Your final selects should be 10-20 images at most. Be brutal in your editing. One incredible photo is worth more than fifty decent ones. Look for peak action, sharp focus, good light, and clean composition. Delete the rest.
Building Your Surf Photography Practice
Start Where You Are
You don't need a $3,000 camera and a $1,500 water housing to start. Grab whatever camera you have — even your phone — and head to the beach. Practice tracking surfers, reading the light, and finding compositions. The fundamentals of timing, positioning, and anticipation don't require expensive gear.
Study the Masters
Follow established surf photographers and study their work: Clark Little's water shots, Todd Glaser's versatility, Morgan Maassen's cinematic style, Ray Collins' wave portraits. Notice their angles, their light, their timing. What makes their best images work?
Shoot Regularly
Like surfing itself, surf photography improves with repetition. The more sessions you shoot, the better you'll become at predicting where surfers will be, what the light will do, and when the decisive moment is about to happen. Aim to shoot at least once a week if you live near the coast.
Share and Get Feedback
Post your work, tag the surfers you photograph, and engage with the local surf photography community. Surfers love seeing photos of themselves, and sharing your work builds relationships that lead to better access and more opportunities to shoot.
The Most Important Tip
Get in the water and surf. The best surf photographers understand surfing because they do it themselves. Knowing how a wave breaks, where a surfer will turn, what a section is about to do — this intuition comes from time on a board, not behind a lens. Your surfing experience will inform every shot you take. And if you're using your own footage to improve, reviewing video is one of the key habits of surfers who improve fast.
Great surf photography isn't about the camera. It's about being in the right place, at the right time, with enough skill to recognize the moment and capture it. Everything in this guide is designed to help you do exactly that.
Now grab your camera and go chase some waves.
Want personalized coaching on water photography?
Neptune's AI coach can help you improve faster with personalized feedback, session tracking, and real-time conditions.